This project uses an old pair of jeans to make a wall-pocket
style holder for wrapping paper.
 |
| Finished Wrapping Paper Holder |
Free + Quick & Dirty
If you have the stuff on hand it's totally free! Besides the jeans all I needed was thread and about two feet of
ribbon. I skipped the normal ironing and pinning that are usually
required for a professional looking outcome. This casual approach works fine because
the worn denim is already going to look pretty casual.
Cut em off at the legs
Lay the jeans flat with both legs together and cut straight
across the leg. Then remove the ankle hem.
 |
| Cut the legs off the pants |
 |
| Cut the hem off the legs |
Hem the Thigh Ends
Turn the legs inside out, and fold the thigh side into about
a 1.5 inch hem and stitch. I used my index finger joint to match the hem depth
as I went around. Note: the thigh inseam did need a little fold to keep the hem
straight (because the inseam is curved the fabric is a tiny bit longer there).
 | |
| Hem the Thigh Side |
Sew Them Shut
Lay the leg flat with the side seams almost matched up. You don't lay the seams right on top of each other so that you can avoid sewing through too many
layers at once. Really any way is fine; just try to do both legs the same way.
 | |
| Sew the ankle side shut |
Turn Right Side Out & Pin
Turn the legs inside-out; they should each look like a long
pocket. Line up the top edges and lay one pocket slightly on top of the other
with an overlap of about 1.5” and pin. I used my index finger as a reference
again. Do the same at the bottom, then the middle, then add a couple more pins
if needed.
 |
| The leg is now a pocket |
 |
| Pin the two pockets together |
Sew Pockets Together
Stitch down edge of the top pocket, sewing the pockets
together. Flip over and stitch along that side too so that the overlap is stitched
down with two rows of stitching.
 |
| Sew the pockets together |
Add Loops
Make a loop of ribbon wide enough to go around 3 fingers
plus a little extra for hem allowance. Cut three other pieces to match. Lay the
project down and smooth flat and pin low on the fold if desired. Place the ribbon
loop on the back side of fabric, just next to the crease and pin. Repeat with
the other side.
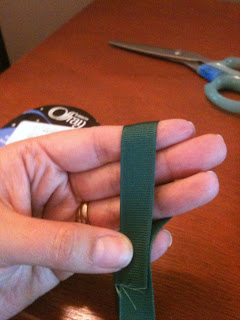 |
| Cut this much ribbon |
 |
| Position the Ribbon on the back side |

Stitch the top part of the ribbon along the top hem, then
turn 90 degrees and stitch more until you almost reach the raw edge, turn again
repeat to the edge of the ribbon, then turn once more to complete the box of
stitching. For extra strength you could also stitch an “X” shape across the
box, but I didn’t bother.

Trim all the loose threads and admire your project. Mine is in the garage hanging on "S" hooks, I would probably use those 3M command hooks for a closet. (I made two
sets of holders, they are sharing the same “S” hook in my picture.)
|
| Finished Holder |
Not bad for totally free and made during nap time!
No comments:
Post a Comment